爬取公众号的方式常见的有两种
- 通过搜狗搜索去获取,缺点是只能获取最新的十条推送文章
- 通过微信公众号的素材管理,获取公众号文章。缺点是需要申请自己的公众号。
今天介绍一种通过抓包PC端微信的方式去获取公众号文章的方法。相比其他的方法非常方便。

如上图,通过抓包工具获取微信的网络信息请求,我们发现每次下拉刷新文章的时候都会请求 mp.weixin.qq.com/mp/profile_ext 这个接口。
经过多次测试分析,用到了以下几个参数
- __biz : 用户和公众号之间的唯一id,
- uin :用户的私密id
- key :请求的秘钥,一段时候只会就会失效。
- offset :偏移量
- count :每次请求的条数
数据如下
{
 "ret": 0,
 "errmsg": "ok", # 请求状态
 "msg_count": 10,  # 信息条数
 "can_msg_continue": 1, # 是否还可以继续获取,1代表可以。0代表不可以,也就是最后一页
 "general_msg_list": "{"list":[]}", # 公众号文本信息
 "next_offset": 20,
 "video_count": 1,
 "use_video_tab": 1,
 "real_type": 0,
 "home_page_list": []
}
部分代码如下
 params = {
        \'__biz\': biz,
        \'uin\': uin,
        \'key\': key,
        \'offset\': offset,
        \'count\': count,
        \'action\': \'getmsg\',
        \'f\': \'json\'
    }

    headers = {
        \'User-Agent\': \'Mozilla/5.0 (Windows NT 10.0; Win64; x64) AppleWebKit/537.36 (KHTML, like Gecko) Chrome/74.0.3729.131 Safari/537.36\'
    }

    response = requests.get(url=url, params=params, headers=headers)
    resp_json = response.json()
    if resp_json.get(\'errmsg\') == \'ok\':
        resp_json = response.json()
        # 是否还有分页数据, 用于判断return的值
        can_msg_continue = resp_json[\'can_msg_continue\']
        # 当前分页文章数
        msg_count = resp_json[\'msg_count\']
        general_msg_list = json.loads(resp_json[\'general_msg_list\'])
        list = general_msg_list.get(\'list\')
        print(list, "**************")
最后打印的list就是公众号的文章信息详情。包括标题(titile)、摘要(digest)、文章地址(content_url)、阅读原文地址(source_url)、封面图(cover)、作者(author)等等...
输出结果如下:
[{
    "comm_msg_info": {
        "id": 1000000038,
        "type": 49,
        "datetime": 1560474000,
        "fakeid": "3881067844",
        "status": 2,
        "content": ""
    },
    "app_msg_ext_info": {
        "title": "入门爬虫,这一篇就够了!!!",
        "digest": "入门爬虫,这一篇就够了!!!",
        "content": "",
        "fileid": 0,
        "content_url": "http:XXXXXX",
        "source_url": "",
        "cover": "I5kME6BVXeLibZDUhsiaEYiaX7zOoibxa9sb4stIwrfuqID5ttmiaoVAFyxKF6IjOCyl22vg8n2NPv98ibow\\/0?wx_fmt=jpeg",
        "subtype": 9,
        "is_multi": 0,
        "multi_app_msg_item_list": [],
        "author": "Python3X",
        "copyright_stat": 11,
        "duration": 0,
        "del_flag": 1,
        "item_show_type": 0,
        "audio_fileid": 0,
        "play_url": "",
        "malicious_title_reason_id": 0,
        "malicious_content_type": 0
    }
},{...},{...},{...},{...},{...},{...},{...},{...},{...}]
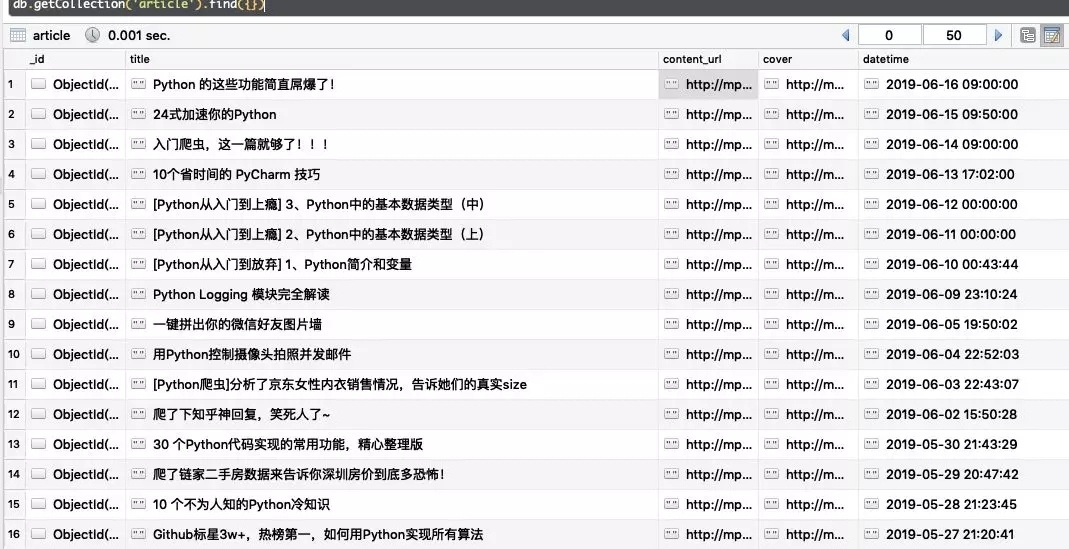
获取数据之后,可以保存到数据库中,也可以将文章保存在PDF中。
1、保存在Mongo中
# Mongo配置
conn = MongoClient(\'127.0.0.1\', 27017)
db = conn.wx  #连接wx数据库,没有则自动创建
mongo_wx = db.article  #使用article集合,没有则自动创建

for i in list:
    app_msg_ext_info = i[\'app_msg_ext_info\']
    # 标题
    title = app_msg_ext_info[\'title\']
    # 文章地址
    content_url = app_msg_ext_info[\'content_url\']
    # 封面图
    cover = app_msg_ext_info[\'cover\']

    # 发布时间
    datetime = i[\'comm_msg_info\'][\'datetime\']
    datetime = time.strftime("%Y-%m-%d %H:%M:%S", time.localtime(datetime))

    mongo_wx.insert({
        \'title\': title,
        \'content_url\': content_url,
        \'cover\': cover,
        \'datetime\': datetime
    })
结果如下
