OpenResty是一款基于Nginx的高性能负载均衡服务器容器,简单来说是Nginx+Lua。结合了Lua语言来对Nginx进行扩展,使得在Nginx上具有web容器功能。
OpenResty运行环境搭建
首先是在CentOS 7.6上的安装过程:
cd /opt
安装编译所需要的环境:
yum install readline-devel pcre-devel openssl-devel gcc
去OpenResty的官网下载安装包:
地址:http://openresty.org/cn/download.html
复制下载地址:
wget https://openresty.org/download/openresty-1.15.8.1.tar.gz
解压文件:
tar -xvzf openresty-1.15.8.1.tar.gz
cd openresty-1.15.8.1
安装OpenResty并设置安装目录为/opt/openresty,如果不做设置,默认会安装至/usr/local/openresty:
./configure --with-cc-opt="-I/usr/local/include" --with-ld-opt="-L/usr/local/lib" --prefix=/opt/openresty
make
make install
至此,OpenResty安装完成,可以尝试启动:
/opt/openresty/nginx/sbin/nginx -c /opt/openresty/nginx/conf/nginx.conf -p /opt/openresty/nginx/
可以查看端口占用:
netstat -tnlp

从图中可以看出nginx已经在监听80端口,用浏览器访问服务器的80端口,如图:
OpenResty已经成功启动
在修改相关配置文件后,需先停止服务,再做启动:
/opt/openresty/nginx/sbin/nginx -s stop
/opt/openresty/nginx/sbin/nginx -c /opt/openresty/nginx/conf/nginx.conf -p /opt/openresty/nginx/
nginx+lua 开发环境配置:
1. 编辑nginx.conf配置文件
vi /opt/openresty/nginx/conf/nginx.conf
2. 在http部分添加如下配置
#lua模块路径,多个之间”;”分隔,其中”;;”表示默认搜索路径,默认到/usr/servers/nginx下找

lua_package_path "/opt/openresty/lualib/?.lua;;"; #lua 模块

lua_package_cpath "/opt/openresty/lualib/?.so;;"; #c 模块
3. 为了方便开发在/opt/openresty/nginx/conf目录下创建一个lua.conf
#lua.conf
server {
    listen 80;
    server_name _;
}
4 在nginx.conf中的http部分添加include lua.conf包含此文件片段
include lua.conf;
5. 测试是否正常
/opt/openresty/nginx/sbin/nginx -t
如果如下图所示,表示配置添加成功
Hello world
1.在lua.conf中server部分添加如下配置
location /lua {
    default_type 'text/html';
    content_by_lua 'ngx.say("hello world")';
}
2. 测试配置是否正确
/opt/openresty/nginx/sbin/nginx -t
3. 重启nginx
/opt/openresty/nginx/sbin/nginx -s stop
/opt/openresty/nginx/sbin/nginx -c /opt/openresty/nginx/conf/nginx.conf -p /opt/openresty/nginx/
4. 访问域名http://xxx.xxx.xxx/lua(自己的机器根据实际情况换ip),可以看到如下内容
hello world
5. lua代码文件
我们把lua代码放在nginx配置中会随着lua的代码的增加导致配置文件太长不好维护,因此我们应该把lua代码移到外部文件中存储。
vi /opt/openresty/nginx/conf/lua/test.lua
我这里把代码放在nginx/config/lua中
修改lua.conf,在http下增加
content_by_lua_file conf/lua/test.lua; #相对于nginx安装目录
现在lua.conf整体为:
#lua.conf
server {
    listen      80;
    server_name  _;
    location /lua {
        default_type 'text/html';
        content_by_lua_file conf/lua/test.lua; #相对于nginx安装目录
    }
}
此处conf/lua/test.lua也可以使用绝对路径/usr/servers/nginx/conf/lua/test.lua。
6. lua_code_cache
默认情况下lua_code_cache 是开启的,即缓存lua代码,即每次lua代码变更必须reload nginx才生效,如果在开发阶段可以通过lua_code_cache off;关闭缓存,这样调试时每次修改lua代码不需要reload nginx;但是正式环境一定记得开启缓存。
#lua.conf
server {
    listen      80;
    server_name  _;
    location /lua {
        default_type 'text/html';
        lua_code_cache off;
        content_by_lua_file conf/lua/test.lua; #相对于nginx安装目录
    }
}
开启后reload nginx会看到如下报警
nginx: [alert] lua_code_cache is off; this will hurt performance in /opt/openresty/nginx/conf/lua.conf:7
7. 错误日志
如果运行过程中出现错误,请不要忘记查看错误日志。
tail -f /opt/openresty/nginx/logs/error.log
到此,基本环境搭建完毕。
nginx+lua项目构建
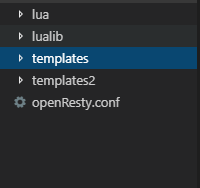
以后我们的nginx lua开发文件会越来越多,我们应该把其项目化,已方便开发。项目目录结构如下所示:
OpenResty
其中我们把lualib也放到项目中的好处就是以后部署的时候可以一起部署,防止有的服务器忘记复制依赖而造成缺少依赖的情况。
我们将项目放到到/usr/openResty目录下。
nginx.conf配置文件修改includ的conf文件,修改为我们项目中的conf,同时修改引入lualib的地址
    #lua模块路径,多个之间”;”分隔,其中”;;”表示默认搜索路径,默认到/usr/servers/nginx下找
    lua_package_path "/usr/openResty/lualib/?.lua;;"; #lua 模块
    lua_package_cpath "/usr/openResty/lualib/?.so;;"; #c 模块

    include /usr/openResty/openResty.conf;
通过绝对路径包含我们的lua依赖库和nginx项目配置文件。
/usr/openResty/openResty.conf的内容如下:
server {
    listen       80;
    server_name  _;

    location /lua {
        default_type 'text/html';
        lua_code_cache off;
        content_by_lua_file /usr/openResty/lua/test.lua;
    }
}
lua文件我们使用绝对路径/usr/openResty/lua/test.lua
到此,整个openResty就可以扔到github上了。
github:git@github.com:meteor1993/openResty.git
